
Vanilla pudding remains a beloved dessert that anyone can master with the right technique. The process begins with simple ingredients found in most kitchens, but success depends on careful attention to temperature and whisking methods. Proper mixing prevents those dreaded lumps while allowing the custard to develop its signature silky texture. The difference between store-bought and homemade pudding becomes immediately apparent in both flavor and mouthfeel. What transforms this basic dessert into something truly special lies in the final steps…
Creamy Stovetop Pudding Recipe
This creamy stovetop vanilla pudding is the epitome of comfort food desserts, combining simple ingredients to create a silky, rich treat that's both nostalgic and elegant. Made with whole milk, egg yolks, and real vanilla, this pudding develops a luxurious texture through careful tempering and constant whisking on the stovetop. Much like air fryer cooking, this method delivers exceptional results with minimal equipment and preparation time.
The beauty of homemade vanilla pudding lies in its versatility and superior flavor compared to instant varieties. This recipe achieves the perfect balance of sweetness and vanilla notes while maintaining that coveted velvety consistency. Whether enjoyed on its own, layered in a trifle, or used as a cake filling, this classic vanilla pudding will become your go-to dessert base.
Ingredients
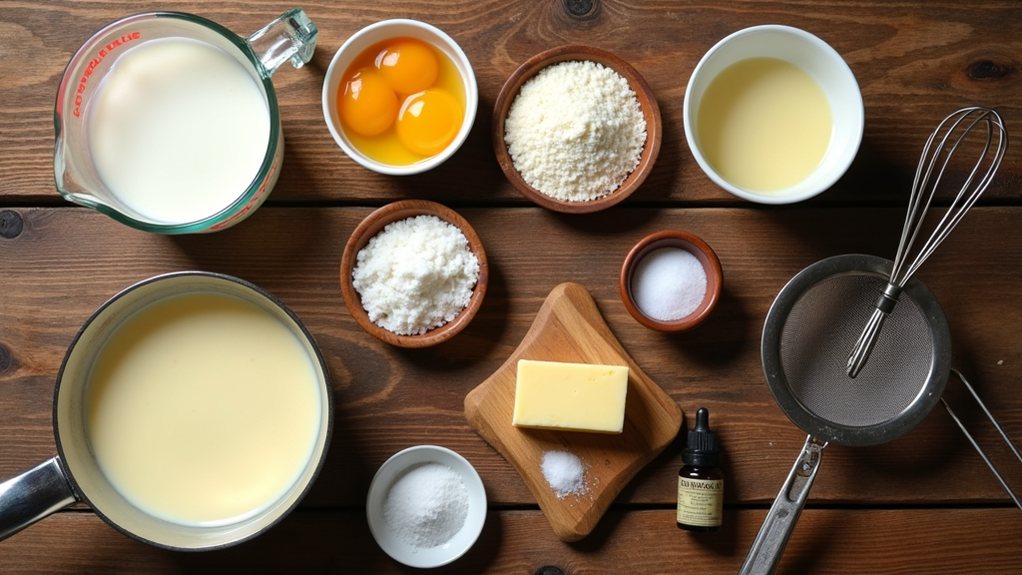
- 2/3 cup granulated sugar
- 3 tablespoons cornstarch
- 1/4 teaspoon salt
- 2 1/2 cups whole milk
- 1/2 cup heavy cream
- 4 large egg yolks, lightly beaten
- 2 tablespoons unsalted butter
- 2 teaspoons pure vanilla extract (or 1 vanilla bean, split and scraped)
In a medium saucepan, whisk together sugar, cornstarch, and salt until well combined. In a separate bowl, whisk together milk, cream, and egg yolks. Gradually add the liquid mixture to the dry ingredients while whisking constantly to prevent lumps.
Place the saucepan over medium heat and cook, whisking continuously, until the mixture begins to bubble and thicken, about 5-7 minutes. Once the pudding coats the back of a spoon, remove from heat and stir in the butter and vanilla until fully incorporated.
Strain the pudding through a fine-mesh sieve into a bowl to guarantee silky smoothness, then press plastic wrap directly onto the surface to prevent a skin from forming. Unlike custards that rely primarily on egg yolks, this recipe creates a silkier texture by using cornstarch as thickener. Refrigerate for at least 2 hours or until completely chilled and set.
For the creamiest texture, never rush the cooking process by using high heat – patience is key to obtaining the perfect consistency without scorching the bottom. If you prefer a more intense vanilla flavor, use a real vanilla bean instead of extract by splitting it lengthwise, scraping out the seeds, and adding both seeds and pod to the milk mixture (removing the pod before serving).
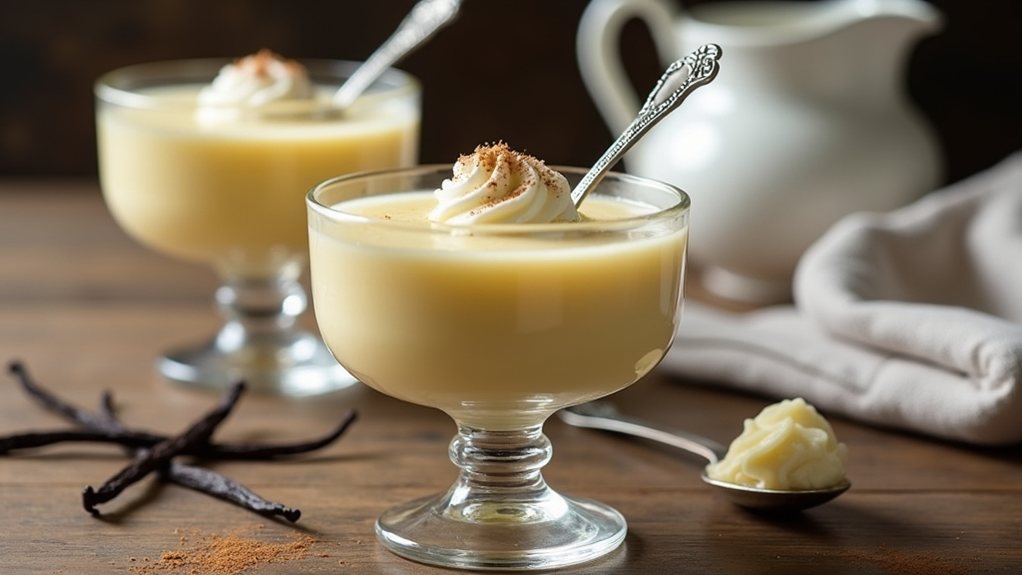
For an elegant presentation, serve in individual glass dishes topped with a dollop of freshly whipped cream and a sprinkle of cinnamon or grated chocolate. The pudding can be stored in the refrigerator for up to three days, though it's at its best within the initial 24 hours.
Smooth-Textured Dessert Secrets
Achieving a perfectly smooth texture in homemade desserts relies on mastering fundamental techniques that professional pastry chefs have refined over generations. The secret lies in quality ingredients—pure vanilla extract and fresh dairy products create the foundation for silky results.
Temperature control prevents the common pitfall of lumpy pudding. Cooking over medium heat while constantly stirring helps cornstarch activate properly without forming clumps. When combining hot liquids with eggs, tempering is crucial—add hot mixture gradually to prevent curdling. Using digital pressure cookers can help maintain consistent temperatures for perfect results every time.
The mixing method matters greatly. Gentle whisking creates airiness without overdeveloping gluten, which can make pudding tough. Additionally, using stabilizers like gelatin can help maintain the desired consistency and prevent weeping or separation.
For ultimate smoothness, strain the finished pudding through a fine-mesh sieve before chilling. This removes any tiny particles that might disrupt the velvety mouthfeel that defines a perfect vanilla pudding.
Classic Pudding Serving Ideas
Countless ways exist to improve vanilla pudding from simple to spectacular through thoughtful presentation and complementary flavors.
Layering techniques transform ordinary pudding into elegant desserts, whether in trifles with sponge cake and whipped cream or parfaits with yogurt and granola.
Fruit pairings offer invigorating contrast, with berries, sliced peaches, and banana being classic choices. For tropical notes, consider mango chunks or grilled pineapple.
Textural elements raise the creamy base—sprinkle crushed graham crackers, cookie pieces, or cereal for satisfying crunch. Nuts like pecans, almonds, or walnuts add both texture and nutty depth.
This single-serving vanilla pudding is perfect for creating individualized desserts with minimal leftovers, making it ideal for those who want portion control or live alone.
Serve your pudding alongside artisan sourdough for a delightful contrast between creamy sweetness and crusty, tangy bread.
Finishing touches matter: a dollop of whipped cream, caramel drizzle, toasted coconut, chocolate shavings, or fresh mint leaves provide visual appeal and flavor complexity, turning humble pudding into a memorable dessert experience.