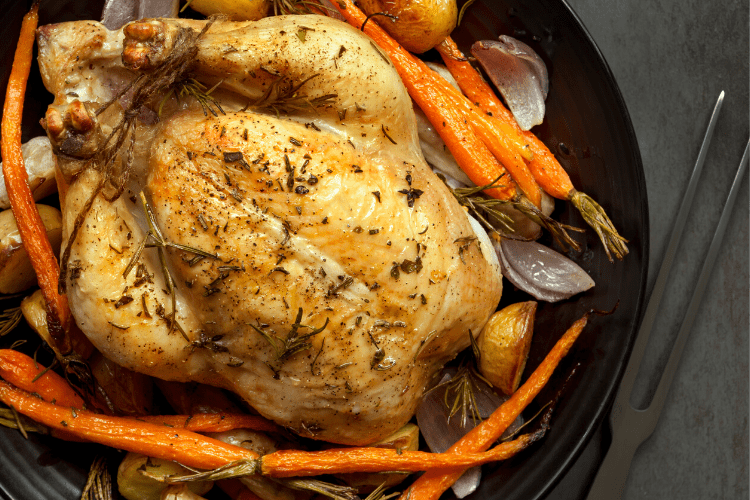
Roasting a whole chicken is a talent that every home cook should learn; whether a 5 lb chicken or a Thanksgiving turkey, the worry of messing up is enough to prevent one from even attempting to make it. But you are destined for the perfect Ninja Foodi roast chicken every time you make it with this recipe. It comes out Moist, tender meat and golden-brown, crispy skin on the outside.
How to Make Roast Chicken In A Ninja Foodi
Step 1. Wash the chicken inside and out and tie the legs together with cooking twine. Remove the neck inside the chicken cavity and discard any excess fat and leftover feathers.
Step 2. Combine the wine and lemon juice in the cooking pot. Put the chicken into the Cook & Crisp Basket and place the basket in the pot.
Step 3. Construct the Pressure Lid, securing the pressure release valve in the Seal position. Choose Pressure and set it to High. Fix the time to 20 minutes, then select Start/Stop to begin.
Step 4. After pressure cooking is complete, immediate-release the Pressure by moving the pressure release valve to the vent position. Carefully remove the Pressure Lid after the Pressure has finished releasing.
Step 5. Combine the olive oil, lime juice, soy sauce, paprika, cumin, oregano, garlic and salt in a small bowl and mix until completely mixed. Brush the mixture over the chicken.
Step 6. Shut the Crisping Lid. Select Air Crisp, set the temperature to 400°F and set the timer to 15 minutes. If you favor a crispier chicken, add an extra 5-10 minutes. Choose Start/Stop to begin.
Step 7. In about 10 minutes, raise the Crisping Lid and sprinkle the chicken with the fresh rosemary. Shut the Crisping Lid and resume cooking.
Step 8. Inserted Instant thermometer into the thickest part of the meat (it should not touch the bone). Carefully lift the chicken from the basket using the Ninja Roast Lifters or 2 large serving forks. When the internal temperature of the chicken reaches 165°F, cooking is completed.
Step 9. Before carving and serving, let the chicken rest for 10 minutes.
No products found.
Ninja Foodi Roast Chicken Dinner
Ingredients
- 1 (4½- to 5-pound) whole chicken
- ½ cup white wine Juice of
- 1 lemon
- 3 tablespoons extra virgin olive oil
- Juice of 2 limes
- ¼ cup low-sodium soy sauce
- 2 tablespoons smoked paprika
- 1½ tablespoons ground cumin
- 6cloves garlic, grated
- 1 tablespoon kosher salt
Instructions
- Remove the neck inside the chicken cavity and discard any excess fat and leftover feathers. Wash the chicken inside and out and tie the legs together with cooking twine.
- Combine the wine and lemon juice in the cooking pot. Put the chicken into the Cook u0026 Crisp Basket and place the basket in the pot.
- Construct the Pressure Lid, securing the pressure release valve in the Seal position. Choose Pressure and set it to High. Fix the time to 20 minutes, then select Start/Stop to begin.
- After pressure cooking is complete, immediate-release the Pressure by moving the pressure release valve to the vent position. Carefully remove the Pressure Lid after the Pressure has finished releasing.
- Combine the olive oil, lime juice, soy sauce, paprika, cumin, oregano, garlic and salt in a small bowl and mix until completely mixed. Brush the mixture over the chicken.
- Shut the Crisping Lid. Select Air Crisp set the temperature to 400°F, and set the time to 15 minutes. If you favor a crispier chicken, add an extra 5-10 minutes. Choose Start/Stop to begin.
- In about 10 minutes, raise the Crisping Lid and sprinkle the chicken with the fresh rosemary. Shut the Crisping Lid and resume cooking.
- It inserted an Instant thermometer into the thickest part of the meat (it should not touch the bone). When the internal temperature of the chicken reaches 165°F, cooking is completed. Carefully lift the chicken from the basket using the Ninja Roast Lifters or 2 large serving forks.
- Before carving and serving, let the chicken rest for 10 minutes.