The homemade pot pie was a time-consuming recipe saved and cooked on Sundays or special events. The Ninja Foodi pot pie recipe is prepared with the pressure cooker setting mode. If you have a favorite pot pie recipe with specific meat and blends of spices, you can also change those in this recipe. From start to finish, you can have this traditional comfort food on your dinner table in under 30 minutes!
How to Make Chicken Pot Pie in Ninja Foodi
Making a Pot Pie in a Ninja Foodi is a fantastic way to use leftover food or ingredients to create an enjoyable and comforting meal. Back in my college days, my grandmother would send me back to school after every holiday break with a turkey potpie from leftover Thanksgiving Day turkey. I would freeze them and take them out when I was yearning for a homemade meal. I want this recipe to give you as much joy as it does me.
Step 1. Choose Sear/Sauté and set it to Medium-High. Allow the pot to preheat for 5 minutes. Select Start/Stop to begin.
Step 2. Add the butter, onion, and garlic to the preheated pot and sauté until the onion is softened, about 3 minutes.
Step 3. Put the chicken or turkey, potatoes, and broth into the pot and season with salt and black pepper. Assemble the Pressure Lid, ensuring the pressure release valve is in the Seal position.
Step 4. Pick Pressure and set it to High. Set the time to 10 minutes, then select Start/Stop to begin.
Step 5. After pressure cooking is complete, quickly release the Pressure by moving the pressure release valve to the vent position. Carefully remove the lid when the Pressure has finished releasing.
Step 6. Choose Sear/Sauté and set it to Medium-High. Add the frozen vegetables and cream to the pot. Stir until the sauce thickens and bubbles, about 3 minutes. Select Start/Stop to begin.
Step 7. Place the piecrust evenly on the filling mixture, folding over the edges if necessary. Make a small cut in the center of the venting crust so that steam can escape during baking.
Step 8. Shut the Crisping Lid. Choose Broil and set the time to 10 minutes. Select Start/Stop to begin.
Step 9. After cooking, please take out the pot from the Ninja Food and place it on a heat-resistant surface. Let the potpie rest for 10 to 15 minutes before serving.
No products found.
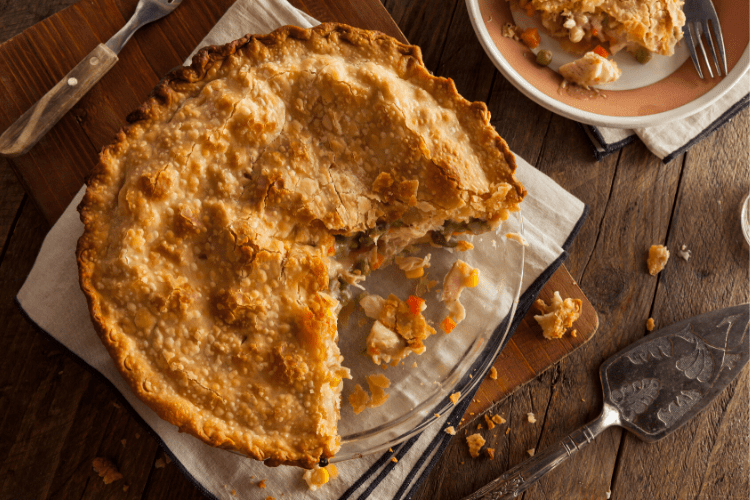
Ninja Foodi Homemade Pot Pie
Ingredients
- 4 Tbsp. (½ stick) unsalted butter
- 1 onion, diced
- 2 garlic cloves, minced
- 2 lb. boneless chicken or turkey breasts cut into 1-inch cubes
- 2 Yukon Gold potatoes, diced
- 1 C. chicken broth
- ½ tsp. Sea salt
- ½ tsp. freshly ground black pepper
- 1 (16-ounce) bag of mixed frozen vegetables
- ½ C. heavy (whipping) cream
- 1 store-bought refrigerated raw piecrust at room temperature
Instructions
- Select Sear/Sauté and set it to Medium-High. Allow the pot to preheat for 5 minutes. Select Start/Stop to begin.
- Put the butter, onion, and garlic in the preheated pot and sauté until the onion is softened about 3 minutes.
- Add the chicken or turkey, potatoes, and broth to the pot—season with salt and black pepper. Assemble the Pressure Lid, ensuring the pressure release valve is in the Seal position.
- Select Pressure and set it to High. Set the time to 10 minutes, then select Start/Stop to begin.
- When pressure cooking is complete, quickly release the Pressure by moving the pressure release valve to the vent position, and carefully remove the lid when the Pressure has finished releasing.
- Select Sear/Sauté and set it to Medium-High. Add the frozen vegetables and cream to the pot. Stir until the sauce thickens and bubbles, about 3 minutes. Select Start/Stop to begin.
- Lay the piecrust evenly on the filling mixture, folding over the edges if necessary. Make a small cut in the center of the crust so that steam can escape during baking.
- Close the Crisping Lid. Select Broil and set the time to 10 minutes. Select Start/Stop to begin.
- When cooking is complete, remove the pot from the Ninja Food and place it on a heat-resistant surface. Let the potpie rest for 10 to 15 minutes before serving.