Ninja Foodi Recipes
Ninja Foodi Yellow Squash (Under 30 Minutes)
Ninja Foodi Grilled yellow squash and onions are an easy, delicious addition to any meal. The combination of hearty squash and sweet charred onion go great with most grilled meats, combining a burst of color and flavor. The yellow squash and red onion can be kept on the Ninja Foodi Grill.
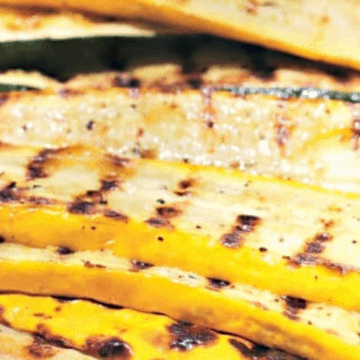
Ninja Foodi yellow squash and onions are an easy, delicious addition to any meal. The combination of hearty squash and sweet charred onion go great with most grilled meats, combining a burst of color and flavor. Or, make these as glorified toppings for your next fixings burger bar! The yellow squash and red onion can be kept on the Ninja Foodi Grill. there are no rules here you can serve them hot or cold!
How to Make Yellow Squash in a Ninja Foodi
My family loves grill Yellow Squash. So naturally, I have been trying to create an excellent way to make it in my traditional Ninja Foodi grill. I have experimented with making them many ways, but this way is my very favorite without all the mess, fuss and hassle.
Step 1. Put in the Grill Grate and shut the lid. Choose GRILL, set the temperature to MAX, and set the time to 15 minutes. Choose START/STOP to start the preheating process.
Step 2. In the meantime, use a small bowl, mix together ½ cup oil, vinegar, and garlic using a whisk, then set aside.
Step 3. Use a large bowl, mix the squash and onion with the remaining 3 tablespoons of oil until equally covered. Then Season to taste with the salt and ground pepper.
Step 4. After the Nina Foodi beeps to signify the unit has preheated, lay the yellow squash and onions on the Grill Grate. Shut the lid and cook for 6 minutes.
Step 5. Cooking for 6 minutes, then open the lid and turn the yellow squash. shut the lid and cook 6 to 9 additional minutes.
Step 6. When both yellow squash and red onions are cooked to your wanted doneness, Take them off the grill. Arrange them on a big platter and add feta cheese on top. Then drizzle some the top with dressing, and top them with a sprinkle of red pepper flakes. Wait let cool 15 minutes before serving.
Ninja Foodi Vegetable Recipes
Ninja Foodi Recipes
Ninja Foodi Roasted Baby Potatoes (Crispy and Delicious)
Ninja Foodi Roasted Potatoes seasoned with rosemary, herbs, and garlic is a fast and easy side-dish for any mealtime. Potatoes soft on the inside and crispy on the outside, they are full of delightful flavors from the rosemary and roasted garlic.
Baby potatoes in ninja foodi air fryer happen to be my favorite side dishes because they are so simple to make, but throughout the summer months, I just can’t stand cooking with my traditional kitchen oven. So the Ninja Foodi air fryer is just the ticket for a simple side dish. Ninja Foodi Roasted Potatoes seasoned with rosemary, herbs, and garlic is a fast and easy side-dish for any mealtime. Potatoes soft on the inside and crispy on the outside, they are full of delightful flavors from the rosemary and roasted garlic.
How to Make Roasted Red Potatoes in ninja Foodi
The best recipes don’t need to be eaten at any time of day or mealtime. I’m referring to that homemade Belgian waffle recipe you wipe out at dinner time or the diner Egg topped burger you order for breakfast. Not only are these Crispy Rosemary Potatoes are the perfect side to any mealtime start, or just a snack for any time of the day!
Step 1. Put in the Crisper Basket and shut the Lid. Choose AIR CRISP, set the temperature to 390°F, and set the time to 20 minutes. Select START/STOP to start Ninja Foodi preheating.
Step 2. In the meantime, Place all the ingredients in a large bowl and mix until evenly coated.
Step 3. After the Ninja unit beeps to let you know it has preheated, Place the potatoes to the Crisper Basket. Shut the lid and cook for 10 minutes.
Step 4. After 10 minutes of cooking shake the crisper basket well. Put the basket back in the Ninja unit and shut the lid to continue cooking.
Step 5. After 10 minutes, stop and check for sought after crispness. Resume cooking up to 5 additional minutes, if needed.
Ninja Foodi Recipes
Ninja Foodi Artichokes (Roasted Lemon-Garlic)
This Ninja Foodi Artichokes recipe is for you. Whether you’ve always appreciated the artichoke’s natural earth tone flavored leaves, or you need a little push to give it a try. You’ll Enjoy every bite till you finally get to the heart.
I never really liked artichokes, so I stayed away from them; after all, they look more like a primitive torture device rather than a vegetable. But let the truth be known, I was always too frightened to cook them, let alone eat them. Whether you appreciated the artichoke’s natural earth tone flavored leaves, or you need a little push to give it a try, this Ninja Foodi Artichokes recipe is for you.
The Ninja Food Grill steams and grills the artichoke at the same time, which results in such an easy delicious tender treat. Serve these artichokes with butter and garlic aioli or you can make your favorite dipping sauce. As you peel off a leaf and pull away from the flesh with your teeth, you’ll Enjoy every bite till you finally get to the heart.
How to Cook Artichokes in a Ninja Foodi Grill
Artichokes take time to cook, you don’t just put them on the grill raw, they take way too long to cook and would most likely burn and dry out first. A tip is brushing the artichokes with oil, sprinkle with salt and pepper, then place them in the grill grate. The Nina Foodi Grill will first steam them and then grills the artichokes for a nice char flavor with nice grill marks.
Step 1. Put in the Grill Grate and shut the lid. Choose GRILL, set the temperature to MAX, and set the time to 10 minutes. Choose START/STOP to start the Nina foodi grill preheating.
Step 2. As the Ninja Foodi Grill is preheating, use a medium bowl, mix the lemon juice, oil, and garlic. Season with salt and pepper, next brush the artichoke halves with the lemon-garlic mix.
Step 3. After the Ninja Foodi Grill beeps to let you know it has preheated, place the artichokes halves on the Grill Grate, cut face down. Lightly press down on them down to maximize grill marks. Shut the lid and grill for 8 to 10 minutes, irregularly basting liberally with the lemon-garlic mix during the cooking process, until char blistered on both sides.
Ninja Foodi Recipes
Ninja Foodi Shishito Peppers (Grilled and Blistered)
These Ninja Foodi Shishito peppers are a treat. I order them all the time as an appetizer at one of my favorite restaurants, but in addition, I like making them from scratch in my Ninja Foodi grill, I prepare everything from asparagus to broccoli zucchini, and more.
Every time I make these Ninja Foodi Shishito Peppers I still remember the time when my good friend Dave ordered shishito peppers at a local tapas restaurant. He offered, which I graciously declined. But, after a bit of negotiating and peer pressure, I tried my first bite and fell in love with the blistered, salty pepper. I hesitantly bit into it and was pleasantly surprised by its bold flavor without the extreme heat I assumed they would have.
How to Make Shishito Peppers in a Ninja Foodi
I love using my Ninja Foodi grill air fryer for grill vegetables! I prepare everything from asparagus to broccoli zucchini, and more. These Shishito peppers are a great treat. I order them all the time as an appetizer at one of my favorite restaurants, but in addition, I like making them from scratch in my Ninja Foodi grill they are so easy to make! I buy them at Whole Foods they come already bagged but many supermarkets and farmers markets carry them as well.
Step 1. Put in the Grill Grate and shut the lid. Choose GRILL, set the temperature to MAX, and set the time to 10 minutes. Choose START/STOP to start the preheating process.
Step 2. As the Ninja Foodi grill is preheating, use a medium bowl, mix the peppers in the oil until equally coated.
Step 3. After the unit beeps to let you know it has preheated, put the peppers on the Ninja Foodi Grill Grate. Press down lightly on the peppers to maximize grill marks. Shut the lid and grill for 8 to 10 more minutes, until they are shishito peppers are blistered on both sides.
Step 4. After cooking is finished, Put the peppers into a serving plate and sprinkle sea salt on top. Serve promptly.
You must be logged in to post a comment Login